Friday, February 21, 2020

5 Tips for Beginner Welders

Hands-on experience is absolutely essential to learn welding. Getting the handle on welding skills takes time and practice before anyone can put it to use. Here are some tips to keep in mind, especially for beginners, to help them adjust better and more quickly to welding training.

  1. Play with the puddle

    The key to welding is creating a puddle in which to melt the filler material. Practice leading the puddle (without trying to join metals). Waiting too long in one place can start to burn a hole through your base metal or get your welder stuck. The speed you travel and the distance you maintain between the rod and the base are crucial. Too close and the rod will stick, but too far and it will splatter or disconnect the arc. Likewise, traveling too fast or too slow will fail to consume the filler material at the appropriate rate, resulting in an inconsistent, weak weld.
  2. Store filler rods in a humidity-controlled environment

    Take care of your tools and they will take care of you. TIG welding in particular relies on the purity of the rod and cleanliness of the surface material for creating a strong weld. Many people store their filler rods in capped PVC pipes. For storing different filler rods, some even use different colored caps so that they can always tell which pipe contains which type rod, even if the pipes are moved.
  3. Find the right travel speed

    The correct travel speed will keep the arc in the leading third of the puddle. Traveling too fast or too slow have different consequences. Welding too slowly will deposit too much material into the puddle, creating a convex weld bead that often lacks proper penetration and appears to be sitting on the surface of the base metal. It also tends to focus the heat into the puddle instead of the base metal, further weakening the weld. Welding too fast creates a thin bead that may undercut the surrounding metal, giving it a concave or recessed shape. It may also create an inconsistent bead as the puddle tries to keep up with the weld.
  4. Calibrate amperage and electrode size before welding

    Amperage is generally determined by the size and type of electrode you use. Too low of an amperage means more sticking. The arc may also go out or stutter, even when held at the appropriate distance. Too high of an amperage could lead to burn-through and excessive noise. The electrode may char, affecting the effectiveness of the flux, and the puddle could be excessively fluid, making it harder to control and more likely to spatter.
  5. Use ergonomic welding solutions

    Welding is a physically demanding job, and it’s important to use your body correctly to avoid long-term injury. Some ways to increase your comfort are to find stable and comfortable working positions that you can remain in for a while, use lifts and tables to bring low work to your level, store tools so you can access them easily without having to reach, and lower the shield of your welding helmet by hand instead of with a head jerk. Tensing up can easily lead to muscle strain so it’s important to stay relaxed and take breaks to stretch.
Tulsa Welding School teaches students, including beginners, the skills they need to start a welding career. For more information about welding training in Tulsa, OK or Jacksonville, FL, contact a TWS Admissions Representative.

WELDING TIPS AND TRICKS | BECOME A BETTER WELDER

You have decided to learn more about welding. Whether you’ve just picked up one of the top rated beginners' welders or have moved on to more advanced methods with one of these quality MIG welders, you aren’t content to stay where you are. It’s time to pick up some welding tips and tricks so you can move forward with new knowledge!

This article offers a lot of great tips and tricks for welders of all skill levels, so you are guaranteed to learn something that will help you as you grow and gain more welding experience. Whether you need MIG welding tips or TIG welding tips, arc welding tips or pipe welding tips, this article can help you! In fact, we even have some overhead welding tips for those tricky jobs! 

Welding Tips And Tricks You Must Learn

There are some very basic welding tricks and tips you need to learn to be a master at your craft.

A lot of people skip the basics, and end up with sloppy welding jobs because they didn’t take time to master the fundamentals.

Here are some basic things to make sure you master before racing ahead with your weld. 

BEFORE YOU START

Work with your gun before you begin your weld. Learn how to handle it. Check its weight in your hands and learn how to support that hand while it is steadying your welder. Let your other hand get familiar with the trigger on the gun.

Make sure you stand in a comfortable position. Practice angling your welding gun in different directions. Learn how to move the gun over your work surface while applying steady force. Learn how to work with the gun movement and find a natural feeling posture.

Next, add your lead to the work piece. Hold your gun so that the weld surface and wire meet at a 30-degree angle. Lightly touch the surface with the wire and squeeze your trigger. Pull the gun gently towards you for the initial weld. Your wire should be perfectly melting into a weld puddle at an even and steady rate of speed, and you should hear a nice little crackling noise. Adjust your welder settings as needed.

PREPARE THE METAL

Your welds will also work better when you properly prepare your metal ahead of time.
A lot of people want to get right to the welding, but taking the time to do things slowly and steadily when you’re learning will help you master the basics and create far more solid welds.
Make a line with your woodworker’s awl or carbide scribe and then cut the line with a metal cutting chop saw or a hacksaw. For stronger welds, use a degreaser to clean your metal. Making sure your metal is free of impurities and particles will help create a stronger weld.

Grind your metal or file it to a slight bevel along your weld edges. This will make sure that your weld can fully penetrate for a deep countersink. This lets you grind your weld flush at the end. If you overdo it you will burn through the metal, so be gentle.

POSITION THE PIECES

When you are building a lot of welds, you need to ensure a perfect angle. Whether your weld is 90 degrees, 45 degrees, or 180 degrees it is important to be precise.

Clamp your surfaces to each other, but leave enough space for your tack weld job. Your pieces should lie flat and neatly fit without any burr interfering. Use a square or carpenter’s triangle to check your angles. Make sure your assembly position is precise. 

TACK WELD

For your tack weld, your goal is to tack the pieces together along the joints. Make sure your corners are squared because if anything shifts you will have to grind the tack weld away and reposition your parts then start all over from the beginning. 

FINISH WELD

When you have tacked your joints into the right positions, you are ready to lay down your weld beads and complete your project.

While nice, smooth welds are ideals and the rhythm is enjoyable, avoid the temptation to keep tracing over your weld until you achieve the perfect, smooth weld. Remember that you will have to grind off any excess metal that you deposit, so the satisfaction will be very short lived, and in the long run it will create more work and waste material. 

POST WELD CLEANUP

When you are done with the weld, you need to take a welding hammer and slowly chip away at the slag. Next, use a grinding wheel (36 grit is great for welding) to knock the beads so that they match the surrounding metal’s level. For a flat and flush surface, you will need to move your grinder along the weld rather than across it. Remove any marks that remain using a 60 grit zirconia flap disc.

To have a great finish, you should prime the steel and paint it, then buff it with some clear wax or spray a finishing coat of clear acrylic over it as soon as you finish to prevent a rust layer from forming. 

WHAT’S THE SECRET TO GREAT WELDS?

When it comes to the best welds, you might be surprised at the answer to this question. Of course, a lot of practice and skill is involved but the best welds always start with a firm foundation and absolute mastery of the basics. A lot of times, experienced welders hold themselves back because they’re so used to the process that they forget some essential steps in the welding process that seem intuitive or unnecessary. 

TIP 1. SAFETY, SAFETY, SAFETY!

Safety is critical when you’re starting a great weld. Always wear a proper face shield, closed toe shoes, on-flammable materials on your clothing, long sleeves and pants, welding gloves, ear protection (like earplugs or muffs), and goggles to protect your eyes from sparks.
This is especially important when it comes to the ear protection because if you puncture your eardrum with a spark, the heat will instantly cauterize it and you will never be able to heal. 
Do not weld galvanized steel. This material has a coating made of zinc, which produces poisonous gasses when it is burned. Exposing yourself to that gas will result in metal poisoning that can cause permanent damage to your body.

Weld in a ventilated area. When you weld, you are going to produce some pretty hazardous fumes, so working in a well ventilated area will reduce the likelihood that you breathe in too many of these fumes. That’s also why a mask will be essential. Masks protect both your eyes from the light and sparks AND your lungs from the gasses, especially if you also have a respirator. 

TIP 2. EQUIPMENT MATTERS

The equipment you use matters. Different forms of welding require different welders and not all jobs are created equally. Make sure that you’re making the right purchasing decision for your style.

Whether you want one of the best TIG welders or one of the best arc welders, reviews matter. Make sure that you are buying the right welder for your job and welding style, but also make sure that you are buying the right welder for your skill level. Read the reviews to learn the best welding machines on the market and how they handle, and try them on for size in store to see how they feel before making any purchasing decisions, even if you want to buy it cheaper online later. 
You also need other tools. Obviously, your safety equipment matters. Skipping the mask and earmuffs can result in permanent damage to your body and health.
You also need to have some good tools for grinding and beveling. Make sure you have some c clamps, wire cutters, and a grinder that can handle angles. These tools will equip you to create professional welds, with flush lines and tacked joints to create smooth, penetrating finishes.

TIP 3. GET YOUR SET UP RIGHT

You want to have enough space for your welding project. This space needs to be well ventilated and unlikely to catch on fire. If you’re just getting started, consider working in your garage.

Make sure you also have your gas set right. For TIG welding, pure Argon will work as your only shielding gas. For MIG welding, you’ll want to blend it with C25.

The settings on your welder are also important. Decide whether you need positive or negative electrons and figure out how to set your welder for the job and gas you have to work with. Along with this, you will want to have great wire loaded into your machine. There are different materials and sizes, so be sure your welder can handle the metal wire you buy and that it is the right type for your weld. 

TIP 4. CLEANLINESS IS EVERYTHING

It is very important to clean your work. Obviously, working with a welder can be very dangerous. The potential for sparks and fires, and the poisonous gasses that it gives off, can combine for a very hazardous environment.

A clean workspace will really help reduce a lot of the risks of welding. Make sure you have only your necessary tools and safety equipment nearby. Keep hazardous chemicals and anything that could go up in flames or cause a reaction well away from your workspace.

Cleaning your metal is also an important part of the welding process. When you clean your metal before you begin welding, it will strip away some of the imperfections that can get trapped in your weld pool and prevent solid and strong weld connections. The cleaner your surface is, the more likely it is that your weld will penetrate deeply and come out with a clean, strong finish. 

TIP 5. STAGGER YOUR WELDING

A lot of people forget about staggering their welds, but it makes a huge difference in the integrity of your project.
Staggering your weld is about what you might imagine when you hear the word. It is an intermittent weld where you move from one side of the joint to the other with your beads.
This means your welds do not line up evenly with each other across the sides of the joint. 
Allow your offset to determine which side begins with the weld. The side of your reference line that has the weld symbol closest to the arrow is the side you will begin your weld bead with, and the other side receives the gap.

TIP 6. KEEP LEARNING ABOUT WELDING

Remember to constantly practice your welding. The industry has several different techniques, each with their own set of rules and strengths. If you really want to become a master at welding, then work and practice in your chosen form of welding until you master it…

Then pick a new form. If you’ve gotten the hang of MIG welding, why not start to learn TIG welding and pipe welding? There are tons of different angles of joints, too. Work on harder and harder types of welding as you begin to master your technique.

You can also work your way down the different positions, and learn how to weld from overhead or flat surfaces, how to weld at every different angle, and how to weld difficult projects. Working with different metals also changes the welding experience. Give some new metals a shot! 
While it's not cheap many people sell off their projects to reinvest and learn more about the trade.

TIP 7. READ YOUR WELDER’S USER MANUAL

Reading your welder’s user manual is a critical first step. Even expert welders need to familiarize themselves with new equipment.
Failing to learn how your machine functions can cause major problems with your welds and even break your machine, or worse cause you to injure or burn yourself. 
Reading the manual will let you know what sort of projects your welder is made for. You will learn the right settings for your machine and better understand how to adjust your levels. It will also help you understand what wires you need to buy and how quickly you can feed it through your machine. 

Welding Tips: The Secret to Success When TIG Welding

Learn the tips & tricks to TIG welding for beginning and intermediate welders from metalworker Ron Covell.

How does TIG welding work? 


All welding requires the application of heat, which melts the metal being welded. With the TIG process, the heat comes from an electric arc that streams between the electrode in a hand-held torch and the metal being welded. The arc and molten metal are shielded by an inert gas, which protects the electrode and base metal from oxidizing. Filler rod is usually added to the puddle of molten metal as the weld progresses. The essence of making a good weld is heat control, which is governed by how you modulate the arc as it streams from the torch. Let’s look at this in detail.

The arc is shaped like a cone, with the tip at the electrode and the base on the metal being welded. The closer the electrode is held to the metal, the smaller the base of the cone  but as you pull the electrode farther away, the base (and puddle) gets larger. If the puddle gets too large, gravity will simply pull it away from the base metal, leaving a hole. This is why thin-gauge metals are especially challenging for beginners. 

What is the best technique for making a good weld?

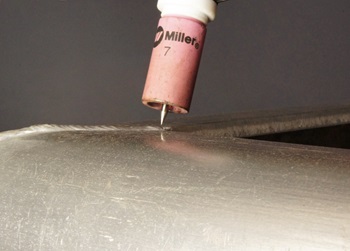
Perhaps the most important skill needed for TIG welding is moving the torch in a controlled manner, with steady forward movement, while keeping the gap between the tip of the electrode and the base metal consistently small  usually in the range of 1/8 inch to 3/16 inch. It requires a lot of practice to precisely control the arc length, keeping it as short as you can without allowing the electrode to touch the base metal or filler rod.
electrode gap
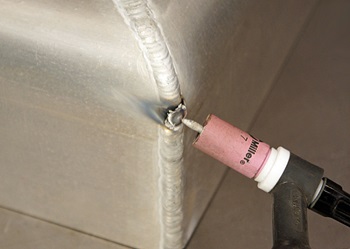
Should the electrode accidentally touch the metal or the filler, the electrode often becomes contaminated  meaning some of the rod or base metal gets stuck to it. Once the electrode is contaminated, the arc cone becomes misshapen, making it difficult or impossible to aim the arc with precision, and the boiling contaminants on the electrode may spit out impurities, further compounding your problems.
contaminated weld
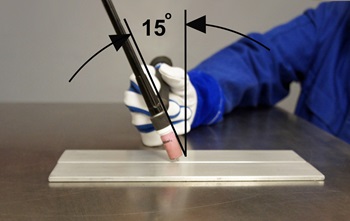
The angle between the torch and the base metal is important, too. You need to angle the torch slightly to see the puddle, and provide access for the filler rod. A 15-degree angle is a good starting place, although some welders prefer a bit more or less. If you hold the torch at 45 degrees (or more), you’re losing a lot of the coverage from shielding gas, and the flatter angle will make the puddle longer than it is wide. For the record, the torch is tipped with the electrode pointing forward, in the direction of motion.
15 degree weld
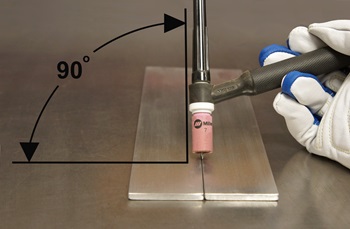
The “work” angle of the torch is also important. With a butt weld, the torch is normally at 90 degrees to the metal, as viewed from the end of the joint.
90 degree weld
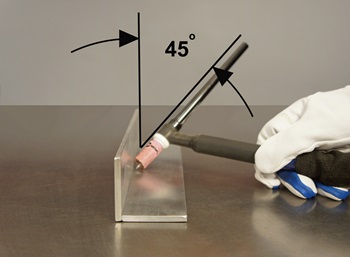
 For making a fillet weld, where the pieces being joined are perpendicular, the work angle is usually 45 degrees, although you may need to modify this sometimes  like when joining metals of different thickness.
45 degree weld
As you can see, there’s a lot going on as you are making a weld, and the key is controlling the angle, movement and distance of the torch in relation to the base metal. This requires making constant, minute adjustments with your torch hand. Simultaneously, the hand that feeds the rod has to move in concert, adding precisely the right amount of filler metal, deposited at the leading edge of the moving puddle, while always keeping the tip of the rod inside the small envelope of shielding gas  whew!

What's the secret?

Here are five tips that can help you attain this fine level of control.
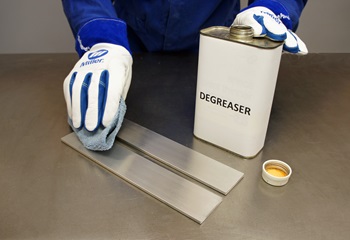
1. Make sure everything is ‘squeaky’ clean. TIG welding is not tolerant of any contaminants. Be sure to clean your base metal with a good degreaser, BEFORE you scrub it with a dedicated wire brush. Do not use the same brush on different kinds of metal. Wipe the filler rod down with degreaser, too.
degreaser image
2. Get comfortable. Whenever possible, I like to be seated when I’m welding. Even in situations where sitting isn’t possible, any little adjustments to my stance or body position that make me more comfortable will have a noticeable effect on the weld.
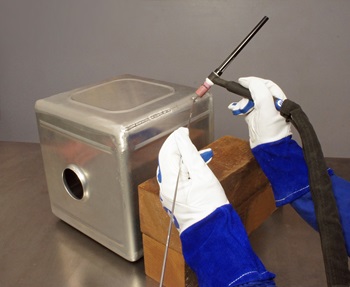
3. Look for ways to support your hands. Having good support for your hands or arms is crucial for moving the torch with precise control. I do my best welding when the base of my hands or my wrists is supported in some way. Often you can rest your wrists on the part being welded. I keep an assortment of wood and metal blocks near my welding bench, and I often can get better support by positioning a block to rest my torch hand on. There are occasions where I rest my forearms, or even my elbows, on something for support. Many welders set up special support bars, positioned parallel to the joint being welded, and they slide their torch hand along the bar to help follow the joint with fine control. For some out-of-position work, I’ve had to rely on resting only my shoulder on something, and while not ideal, it’s better than having no support at all. Even placing my hip against something stationary can offer a bit of support, but I can’t weld very well when standing ‘free,’ with no support at all.
tig welding a block
4. Do a practice run. This may sound silly, but you’ll find that many professional welders do this before every pass. Get in the most comfortable position you can, with support blocks in place if helpful, and run your hands along the path they will traverse as you make the weld. You will often find that a slight adjustment of your position will allow you to make a longer pass, or to move your hands with less stress. Any strain in your position will have a negative impact on the weld. Also, you build valuable muscle memory when making your practice run, which will help keep everything on track when you make the ‘real’ pass.
5. Clean a contaminated electrode immediately! Every welder will contaminate their electrode at some point, but it’s essential that you replace a contaminated electrode immediately. I usually keep a group of pre-sharpened electrodes right on my welding bench, so I can swap them out without having to walk to my grinder.
image of tungsten and tig welding torch
I believe if you put these tips to use, you will very likely see an improvement in your TIG welds!

Essential Welding Tips and Tricks for Professionals of All Ages

Whether you’re a seasoned professional, just getting into the welding profession or a passionate welding DIYer and hobbyist, it can’t hurt to brush up on some tips. Detailed below are tips for a couple of different welding methods, in addition to some general safety tips and reminders to ensure that your welding minimizes harm to yourself, others around you and your work setting.


Metal Inert Gas (MIG) Welding

Also known as gas metal arc welding (GMAW) or metal active gas (MAG) welding, MIG welding relies on the continuous feeding of a spool of hot metal wire to melt two components of metal together. MIG welding is typically quicker and easier to do than TIG welding, which we’ll get to in a moment.

Make Sure Your Wire Is Feeding Properly

Choosing the correct drive roll is crucial to your wire’s continuous feed during the course of the MIG welding process. Not enough tension can result in a poor feed. Bends in the wire can also lead to lost tension, so be sure to keep the gun as straight as you possibly can.


Know the Correct Specs for the Job and Your Equipment

This includes knowing which kind of gas best accommodates your wire, be it argon, carbon dioxide or a mix of the two. The kind of job you’re working on dictates specific kinds of wires and gas. Additionally, the contact tip recess you use varies depending on the type of project you hope to complete. Generally, you want to increase the size of the recess in conjunction with the current.

Point Your Wire at the Leading Edge of the Weld Puddle

To ensure best accuracy during the MIG welding process, keep your electrode pointed at the leading edge (i.e., toward the metal that has not yet been welded) of the weld puddle or pool. If you’re welding in an unusual position, you should use a wire with a smaller diameter to keep the weld pool small and minimize drip.

Tungsten Inert Gas (TIG) Welding

TIG welding, otherwise known as gas tungsten arc welding (GTA or GTAW), is a process that uses a tungsten electrode aided by a shielding gas, usually argon or helium, to fuse metal. This process is more precise than MIG welding, but also more time-consuming.


Choose the Right Rod Size for the Job

Ideally, the thickness of the rod should match the thickness of the metal you’re working on. You wouldn’t want to use a thick rod — say, 1/8” in diameter — on a weak piece of metal because you could easily put a hole through it with the sheer heat of the rod relative to the sheet. One benefit of TIG welding is the increased precision, but you still have to use the right tools to reap that advantage.

Clean Your Metal Before TIG Welding

If the metal you wish to TIG weld is rusted, scaled or painted, you’ll want to grind it down before you get started. Unlike MIG welding, TIG welding is more easily compromised if the metal is not clean. Polishing the metal alone will not suffice and can result in a tacky-looking finished product if you elect to take shortcuts in preparation.

Make Sure to Extend Your Tungsten Electrode to the Right Length

Having the tip of your electrode positioned at the proper length is crucial to the final product when you’re TIG welding. If the tip is not sticking out far enough, you won’t be able to see it — or, consequently, where you’re welding the metal. On the other hand, if the tip is out too far from the cup, the heat of the torch won’t be concentrated enough around the area you’re trying to weld and will probably end up melting your rod into the weld.

Safety Tips for Welding of All Kinds

It could be argued that many of the tips already presented fall into the category of safety tips, which is true. Having a working knowledge of the right equipment certainly contributes to minimizing the number of personal injuries experienced by welders. However, there are additional measures that should be taken to further reduce such risks.

Have a Spotter

It’s always a good idea to have someone watch you while you’re welding, if you can. This is especially true when welding around flammable materials. Having another set of eyes in the vicinity can reduce the risk of fires in the event that sparks get out of hand. Also, make sure to familiarize yourself with your surroundings and locate the nearest fire exits.

Personal Protective Equipment

Referred to as PPE for short, personal protective equipment is your first and last line of defense against heat, sparks and other hazards associated with welding. Wearing a mask with a shade dark enough to sufficiently protect your eyes from the brightness of the arc is an absolute must. You should also wear flame-retardant cotton or leather clothing with long sleeves and long pants, as well as fire-resistant gloves, to protect your extremities from sparks. Additional eye protection beneath the mask is also recommended, on top of some sort of ear protection to prevent impalement by debris.

Check Your Ventilation

It’s of the utmost importance that you are able to breathe clean air while you weld. You should always wear an approved respirator to protect your lungs against the fumes of dangerous metal oxide compounds. If you experience issues with your ventilation system, stop welding and address the problem immediately.

Discover the Summit Welding Difference


Welding Some of you readers are probably wondering how to go about breaking into a welding career of your own. The answer is simple. It all begins with a quality trade school education that will provide you with the education you need to start welding and give you the chance to be on your way to a rewarding career. Summit College’s welding program could be just the program for you.

Summit College is dedicated to providing students with the personal attention they need to succeed in learning the welding trade. As a student in Summit College’s welding program, you will be immersed in the basics of welding upon which your career in the industry will be built. Summit’s comprehensive welding curriculum includes courses in such subjects as:

Shielded Metal Arc Welding
Flux Cored Arc Welding and Blueprint Reading
SMAW Pipefitting and Layout
Fabrication and Repair
Career Development
Summit’s program will help prepare you for a welding career in various settings, such as the automotive, construction, trucking and railroad, and ironworks industries and more.

Summit College is proud to offer its nine-month welding program at its Colton, El Cajon and Santa Ana campuses in California. To accommodate the most potential students, day, afternoon and night classes are available to help you fit your education into your busy daily life. You can also benefit by being able to finish the program and begin working sooner than your peers who may have opted for four-year programs at a traditional college or university.

The instructors in Summit’s welding program are experienced and knowledgeable professionals who provide students with individual attention to ensure they learn the necessary welding skills.  Students learn the ins and outs of the profession in classroom and laboratory settings.

Summit College also offers students career assistance that can help you find employment, including resume help, mock interviews and externships. This wealth of resources can help you make the most of the openings in the welding field.

What are you waiting for? Combine your passion for the trade with a program dedicated to helping you achieve your dreams and create a meaningful career by visiting https://summitcollege.edu/ today.

Welding 101: Yes, You Can Learn How to Weld. Here's How

If you're never welded before, today's easy-to-use wire-feed units speed up the learning process. Time to spark your creativity.


1

Before You Start

First, practice handling the gun without actually welding. Rest its barrel in one hand, and support that hand on the table. The other hand operates the gun's trigger. Stand in a comfortable position and move the gun steadily over the work surface. Adjust your posture and gun movement so that they feel natural.
Attach the work lead to the work piece, and hold the gun so the wire meets the weld surface at about a 30-degree angle. Touch the wire very lightly to the surface, squeeze the trigger, and gently pull the gun toward you to make your first test weld. The wire should melt off into the weld puddle at an even rate and make a steady crackling noise as you go. Adjust the welder settings if needed.


2Prepare the Metal

Mark a line with a carbide scribe or woodworker's awl, and cut with a metal-cutting chop saw or a hacksaw. For a strong weld, clean the metal with a desegregate.

3
Prepare the Metal (Cont.)

Next, grind or file a slight bevel along the edges you're welding. This ensures the weld penetrates as deeply as possible and countersinks it so you can grind it flush. Don't overdo it or you'll burn through the metal when you weld.

4
Position the Pieces

When building a project like our C table, you'll need to form exact 90-degree angles. Clamp the mitered surfaces together, leaving enough room to put down a tack weld. The pieces should lie flat and fit neatly without a metal burr interfering.
Check the assembly's position with a square. Use a carpenter's aluminum triangle square on the inside of the joint, or a steel carpenter's square on the outside.

5Tack Weld

Tack the pieces together at a couple of places along each joint. Check again for square corners; if anything shifts and puts the assembly out of square, grind away the tack weld, reposition the parts, and try again.

6
Finish Weld

After you've tacked everything into place, lay down your final weld beads. As enjoyable as it is to create nice, smooth welds, resist the temptation to overdo it. The more metal you deposit, the more you'll need to grind off.

7Post-Weld Cleanup

Chip off the slag with a welding hammer, and then use a 36-grit grinding wheel to knock the beads down to the surrounding metal. To ensure a flat, flush surface, move the grinder along the weld, not across it. Remove any marks with a 60-grit zirconia flap disc.


Finishing Tip


Prime and paint the steel, buff some clear wax over it, or spray on a coating of clear acrylic. But do it sooner rather than later. You don't want a layer of rust to form.


8
Make This Metal C Table

Our C table is an elegant reduction of furniture to an industrial form. Two 16-inch-square frames are joined by two 15-inch-long uprights. Use the structure to support a top of wood, stone, glass, or metal.

It's an ideal project for a first-time welder. All 10 pieces of steel are cut from 1-inch-square steel tubing with a 1/16-inch wall thickness. The pieces for the top and bottom frames are joined with 45-degree miters. The two uprights meet the frames with butt joints. And the welding couldn't be simpler: Flux-cored arc welding with a low amperage setting and a slow wire speed is about as easy and forgiving a process as you can learn.